Parodos
Choose a section from the list below. For Parodos introduction, check the Quick Start.
This is the multi-page printable view of this section. Click here to print.
Choose a section from the list below. For Parodos introduction, check the Quick Start.
This quickstart guide will help you install the Orchestrator using the helm chart and execute a sample workflow through the Red Hat Developer Hub orchestrator plugin UI.
Install Orchestrator: Follow the installation instructions for Orchestrator.
Install a sample workflow: Follow the installation instructions for the greetings workflow.
Access Red Hat Developer Hub: Open your web browser and navigate to the Red Hat Developer Hub application. Retrieve the URL using the following OpenShift CLI command.
oc get route backstage-backstage -n rhdh-operator -o jsonpath='{.spec.host}'
Make sure the route is accessible to you locally.
Login to backstage Login to backstage with the Guest account.
Navigate to Orchestrator:
Navigate to the Orchestrator page by clicking on the Orchestrator icon in the left navigation menu.

Execute Greeting Workflow:
Click on the ‘Execute’ button in the ACTIONS column of the Greeting workflow.
 The ‘Run workflow’ page will open. Click ‘Next step’ and then ‘Run’


Monitor Workflow Status:
Wait for the status of the Greeting workflow execution to become Completed. This may take a moment.

The Orchestrator architecture comprises several integral components, each contributing to the seamless execution and management of workflows. Illustrated below is a breakdown of these components:

The Orchestrator features two primary workflow categories:
In the Orchestrator, an infrastructure refers to a workflow that executes a sequence of operations based on user input (optional) and generates output (optional) without requiring further action.
To define this type, developers need to include the following annotation in the workflow definition file:
annotations:
  - "workflow-type/infrastructure"
The Orchestrator plugin utilizes this metadata to facilitate the processing and visualization of infrastructure workflow inputs and outputs within the user interface.
In the Orchestrator, an assessment is akin to an infrastructure workflow that concludes with a recommended course of action. Upon completion, the assessment yields a workflowOptions object, which presents a list of infrastructure workflows suitable from the user’s inputs evaluation.
To define this type, developers must include the following annotation in the workflow definition file:
annotations:
  - "workflow-type/assessment"
The Orchestrator plugin utilizes this metadata to facilitate the processing and visualization of assessment workflow inputs and outputs within the user interface. This includes generating links to initiate infrastructure workflows from the list of recommended options, enabling seamless execution and integration.
The workflowOptions object must possess six essential attributes with specific types, including lists that can be empty or contain objects with id and name properties, similar to the currentVersion attribute. See an example in the below code snippet.
It is the assessment workflow developer’s responsibility to ensure that the provided workflow id in each workflowOptions attribute exists and is available in the environment.
{
    "workflowOptions": {
      "currentVersion": {
        "id": "_AN_INFRASTRUCTURE_WORKFLOW_ID_",
        "name": "_AN_INFRASTRUCTURE_WORKFLOW_NAME_"
      },
      "newOptions": [],
      "otherOptions": [],
      "upgradeOptions": [],
      "migrationOptions": [
        {
            "id": "_ANOTHER_INFRASTRUCTURE_WORKFLOW_ID_",
            "name": "_ANOTHER_INFRASTRUCTURE_WORKFLOW_NAME_"
        }
      ],
      "continuationOptions": []
    }
}
If the aforementioned annotation is missing in the workflow definition file, the Orchestrator plugin will default to treating the workflow as an infrastructure workflow, without considering its output.
To avoid unexpected behavior and ensure clarity, it is strongly advised to always include the annotation to explicitly specify the workflow type, preventing any surprises or misinterpretations.
The deployment of the orchestrator involves multiple independent components, each with its unique installation process. Presently, our supported method is through a specialized Helm chart designed for deploying the orchestrator on either OpenShift or Kubernetes environments. This installation process is modular, allowing optional installation of components if they are already present.
The Orchestrator deployment encompasses the installation of the engine for serving serverless workflows and Backstage, integrated with orchestrator plugins for workflow invocation, monitoring, and control.
In addition to the Orchestrator deployment, we offer several workflows (linked below) that can be deployed using their respective installation methods.
The following guide is for installing on a Kubernetes cluster. It is well tested and working in CI with a kind installation.
Here’s a kind configuration that is easy to work with (the apiserver port is static, so the kubeconfig is always the same)
kind: Cluster
apiVersion: kind.x-k8s.io/v1alpha4
networking:
  apiServerAddress: "127.0.0.1"
  apiServerPort: 16443
nodes:
  - role: control-plane
    kubeadmConfigPatches:
    - |
      kind: InitConfiguration
      nodeRegistration:
        kubeletExtraArgs:
          node-labels: "ingress-ready=true"
    extraPortMappings:
      - containerPort: 80
        hostPort: 9090
        protocol: TCP
      - containerPort: 443
        hostPort: 9443
        protocol: TCP
  - role: worker
Save this file as kind-config.yaml, and now run:
kind create cluster --config kind-config.yaml
kubectl apply -f https://projectcontour.io/quickstart/contour.yaml
kubectl patch daemonsets -n projectcontour envoy -p '{"spec":{"template":{"spec":{"nodeSelector":{"ingress-ready":"true"},"tolerations":[{"key":"node-role.kubernetes.io/control-plane","operator":"Equal","effect":"NoSchedule"},{"key":"node-role.kubernetes.io/master","operator":"Equal","effect":"NoSchedule"}]}}}}'
The cluster should be up and running with Contour ingress-controller installed, so localhost:9090 will direct the traffic to backstage, because of the ingress created by the helm chart on port 80.
This chart will install the Orchestrator and all its dependencies on kubernetes.
THIS CHART IS NOT SUITED FOR PRODUCTION PURPOSES, you should only use it for development or tests purposes
The chart deploys:
helm repo add orchestrator https://parodos-dev.github.io/orchestrator-helm-chart

helm install orchestrator orchestrator/orchestrator-k8s
All of the backstage app-config is derived from the values.yaml.
To use secret as env vars, like the one used for the notification, see charts/Orchestrator-k8s/templates/secret.yaml Every key in that secret will be available in the app-config for resolution.
git clone https://github.com/parodos-dev.github.io/orchestrator-helm-chart
cd orchestrator-helm-chart/charts/orchestrator-k8s


helm repo add bitnami https://charts.bitnami.com/bitnami
helm repo add backstage https://backstage.github.io/charts
helm repo add postgresql-persistent https://sclorg.github.io/helm-charts
helm repo add redhat-developer https://redhat-developer.github.io/rhdh-chart
helm repo add workflows https://parodos.dev/serverless-workflows-config

helm dependencies build
helm install orchestrator .
The output should look like that
$ helm install orchestrator .
Release "orchestrator" has been upgraded. Happy Helming!
NAME: orchestrator
LAST DEPLOYED: Tue Sep 19 18:19:07 2023
NAMESPACE: default
STATUS: deployed
REVISION: 1
NOTES:
This chart will install RHDH-backstage(RHDH upstream) + Serverless Workflows.

To get RHDH's route location:
    $ oc get route orchestrator-white-backstage -o jsonpath='https://{ .spec.host }{"\n"}'

To get the serverless workflow operator status:
    $ oc get deploy -n sonataflow-operator-system

To get the serverless workflows status:
    $ oc get sf
The chart notes will provide more information on:
Installing the Orchestrator is facilitated through a Helm chart that is responsible for installing all of the Orchestrator components. The Orchestrator is based on the SonataFlow and the Serverless Workflow technologies to design and manage the workflows. The Orchestrator plugins are deployed on Red Hat Developer Hub instance, serves as the frontend. To utilize Backstage capabilities, the Orchestrator imports software templates designed to ease the development of new workflows and offers an opinionated method for managing their lifecycle by including CI/CD resources as part of the template.
Deploy the Orchestrator solution suite using this Helm chart.
The chart installs the following components onto the target OpenShift cluster:
orchestrator project (optional: disabled by default)Note that as of November 6, 2023, OpenShift Serverless Operator is based on RHEL 8 images which are not supported on the ARM64 architecture. Consequently, deployment of this helm chart on an OpenShift Local cluster on MacBook laptops with M1/M2 chips is not supported.
GITHUB_TOKEN with the necessary permissions as detailed here.Get the Helm chart from one of the following options
Pre-Packaged Helm Chart
If you choose to install the Helm chart from the Helm repository, you’ll be leveraging the pre-packaged version provided by the chart maintainer. This method is convenient and ensures that you’re using a stable, tested version of the chart.
Add the repository:
helm repo add orchestrator https://parodos-dev.github.io/orchestrator-helm-chart
Expect result:
"orchestrator" has been added to your repositories
Verify the repository is shown:
helm repo list
Expect result:
NAME        	URL
orchestrator	https://parodos-dev.github.io/orchestrator-helm-chart
Manual Chart Deployment
By cloning the repository and navigating to the charts directory, you’ll have access to the raw chart files and can customize them to fit your specific requirements.
git clone git@github.com:parodos-dev/orchestrator-helm-chart.git
cd orchestrator-helm-chart/charts
Create a namespace for the Orchestrator solution:
oc new-project orchestrator
Set GITHUB_TOKEN environment variable
export GITHUB_TOKEN=<github token>
Deploy PostgreSQL reference implementation following these instructions
Install the orchestrator Helm chart:
helm upgrade -i orchestrator orchestrator/orchestrator --set rhdhOperator.github.token=$GITHUB_TOKEN
Run the commands prompted at the end of the previous step to wait until the services are ready.
Install Red Hat OpenShift Pipelines and Red Hat OpenShift GitOps operators following these instructions.
The Orchestrator installs RHDH and imports software templates designed for bootstrapping workflow development. These templates are crafted to ease the development lifecycle, including a Tekton pipeline to build workflow images and generate workflow K8s custom resources. Furthermore, ArgoCD is utilized to monitor any changes made to the workflow repository and to automatically trigger the Tekton pipelines as needed. This installation process ensures that all necessary Tekton and ArgoCD resources are provisioned within the same cluster.
Download the setup script from the github repository and run it to to set up environment variables:
wget https://raw.githubusercontent.com/parodos-dev/orchestrator-helm-chart/stable-1.x/hack/setenv.sh -O /tmp/setenv.sh && chmod u+x /tmp/setenv.sh
This script generates a .env file that contains all the calculated environment variables. Run source .env to utilize these variables.
NOTE: If you don’t want to use the default values, omit the
--use-defaultand the script will prompt you for input.Default values are calculated as follows:
WORKFLOW_NAMESPACE: Default value is set tosonataflow-infra.K8S_CLUSTER_URL: The URL of the Kubernetes cluster is obtained dynamically usingoc whoami --show-server.K8S_CLUSTER_TOKEN: The value is obtained dynamically based on the provided namespace and service account.GITHUB_TOKEN: This value is prompted from the user during script execution and is not predefined.ARGOCD_NAMESPACE: Default value is set toorchestrator-gitops.ARGOCD_URL: This value is dynamically obtained based on the first ArgoCD instance available.ARGOCD_USERNAME: Default value is set toadmin.ARGOCD_PASSWORD: This value is dynamically obtained based on the first ArgoCD instance available.
Install the orchestrator Helm chart:
helm upgrade -i orchestrator orchestrator/orchestrator --set rhdhOperator.github.token=$GITHUB_TOKEN \
--set rhdhOperator.k8s.clusterToken=$K8S_CLUSTER_TOKEN --set rhdhOperator.k8s.clusterUrl=$K8S_CLUSTER_URL \
--set argocd.namespace=$ARGOCD_NAMESPACE --set argocd.url=$ARGOCD_URL --set argocd.username=$ARGOCD_USERNAME \
--set argocd.password=$ARGOCD_PASSWORD --set argocd.enabled=true --set tekton.enabled=true
Run the commands prompted at the end of the previous step to wait until the services are ready.
Sample output:
NAME: orchestrator
LAST DEPLOYED: Fri Mar 29 12:34:59 2024
NAMESPACE: sonataflow-infra
STATUS: deployed
REVISION: 1
TEST SUITE: None
NOTES:
Helm Release orchestrator installed in namespace sonataflow-infra.

Components                   Installed   Namespace
====================================================================
Backstage                    YES        rhdh-operator
Postgres DB - Backstage      NO         rhdh-operator
Red Hat Serverless Operator  YES        openshift-serverless
KnativeServing               YES        knative-serving
KnativeEventing              YES        knative-eventing
SonataFlow Operator          YES        openshift-serverless-logic
SonataFlowPlatform           YES        sonataflow-infra
Data Index Service           YES        sonataflow-infra
Job Service                  YES        sonataflow-infra
Tekton pipeline              YES        orchestrator-gitops
Tekton task                  YES        orchestrator-gitops
ArgoCD project               YES        orchestrator-gitops

====================================================================
Prerequisites check:
The required CRD tekton.dev/v1beta1/Task is already installed.
The required CRD tekton.dev/v1/Pipeline is already installed.
The required CRD argoproj.io/v1alpha1/AppProject is already installed.
====================================================================


Run the following commands to wait until the services are ready:
```console
  oc wait -n openshift-serverless deploy/knative-openshift --for=condition=Available --timeout=5m
  oc wait -n knative-eventing knativeeventing/knative-eventing --for=condition=Ready --timeout=5m
  oc wait -n knative-serving knativeserving/knative-serving --for=condition=Ready --timeout=5m
  oc wait -n openshift-serverless-logic deploy/logic-operator-rhel8-controller-manager --for=condition=Available --timeout=5m
  oc wait -n sonataflow-infra sonataflowplatform/sonataflow-platform --for=condition=Succeed --timeout=5m
  oc wait -n sonataflow-infra deploy/sonataflow-platform-data-index-service --for=condition=Available --timeout=5m
  oc wait -n sonataflow-infra deploy/sonataflow-platform-jobs-service --for=condition=Available --timeout=5m
  oc wait -n rhdh-operator backstage backstage --for=condition=Deployed=True
  oc wait -n rhdh-operator deploy/backstage-backstage --for=condition=Available --timeout=5m
During the installation process, Kubernetes jobs are created by the chart to monitor the installation progress and wait for the CRDs to be fully deployed by the operators. In case of any failure at this stage, these jobs remain active, facilitating administrators in retrieving detailed diagnostic information to identify and address the cause of the failure.
Note: that these jobs are automatically deleted after the deployment of the chart is completed.
Create the HelmChartRepository from CLI (or from OpenShift UI):
cat << EOF | oc apply -f -
apiVersion: helm.openshift.io/v1beta1
kind: HelmChartRepository
metadata:
  name: orchestrator
spec:
  connectionConfig:
    url: 'https://parodos-dev.github.io/orchestrator-helm-chart'
EOF
Follow Helm Chart installation instructions here
See the dedicated document
In addition to the prerequisites mentioned earlier, it is possible to manually install the following operator:
ArgoCD/OpenShift GitOps operatorArgoCD exists in the designated namespace (referenced by ARGOCD_NAMESPACE environment variable).argoproj.io/v1alpha1/AppProjectTekton/OpenShift Pipelines operatortekton.dev/v1beta1/Task and tekton.dev/v1/PipelineSee here
If you manually created the workflow namespaces (e.g., $WORKFLOW_NAMESPACE), run this command to add the required label that allows ArgoCD deploying instances there:
oc label ns $WORKFLOW_NAMESPACE argocd.argoproj.io/managed-by=$ARGOCD_NAMESPACE
Follow Workflows Installation
To remove the installation from the cluster, run:
helm delete orchestrator
release "orchestrator" uninstalled
Note that the CRDs created during the installation process will remain in the cluster. To clean the rest of the resources, run:
oc get crd -o name | grep -e sonataflow -e rhdh | xargs oc delete
oc delete namespace orchestrator
oc wait commandsIf you encounter errors or timeouts while executing oc wait commands, follow these steps to troubleshoot and resolve the issue:
oc wait commands to identify which deployments met the condition and which ones encountered errors or timeouts.
For example, if you see error: timed out waiting for the condition on deployments/sonataflow-platform-data-index-service, investigate further using oc describe deployment sonataflow-platform-data-index-service -n sonataflow-infra and oc logs sonataflow-platform-data-index-service -n sonataflow-infraIn addition to deploying the Orchestrator, we provide several preconfigured workflows that serve either as ready-to-use solutions or as starting points for customizing workflows according to the user’s requirements. These workflows can be installed either through a Helm chart or by utilizing Kustomize.
This repository serves as a Helm chart repository for deploying serverless workflows with the Sonataflow Operator. It encompasses a collection of pre-defined workflows, each tailored to specific use cases. These workflows have undergone thorough testing and validation through Continuous Integration (CI) processes and are organized according to their chart versions.
The repository includes a variety of serverless workflows, such as:
To utilize the workflows contained in this repository, the Orchestrator Deployment must be installed on your OpenShift Container Platform (OCP) cluster. For detailed instructions on installing the Orchestrator, please visit the Orchestrator Helm Repository
Note With the existing version of the Orchestrator helm chart, all workflows should be created under the sonataflow-infra namespace.
helm repo add orchestrator-workflows https://parodos.dev/serverless-workflows-config
View available workflows on the Helm repository:
helm search repo orchestrator-workflows
The expected result should look like (with different versions):
NAME                            	CHART VERSION	APP VERSION	DESCRIPTION
orchestrator-workflows/greeting 	0.4.2        	1.16.0     	A Helm chart for the greeting serverless workflow
orchestrator-workflows/move2kube	0.2.16       	1.16.0     	A Helm chart to deploy the move2kube workflow.
orchestrator-workflows/mta      	0.2.16       	1.16.0     	A Helm chart for MTA serverless workflow
orchestrator-workflows/workflows	0.2.24       	1.16.0     	A Helm chart for serverless workflows
You can install each workflow separately. For detailed information, please visit the page of each workflow:
https://www.parodos.dev/serverless-workflows-config/index.yaml
The workflows can be deployed by Kustomize.
Under each workflow folder, there is a README file with detailed instructions on how to install the workflow separately.
Documentation section of the project selected set of workflows.
Documents can include markdown content from all the related parodos-dev repositories.
To create a document entry from a markdown file use this:
./generate-doc-for-repo.sh \
    https://github.com/parodos-dev/serverless-workflows/blob/main/README.md > content/docs/workflows/newdoc.md
A selected set of serverless workflows
The structure of this repo a directory per workflow at the root. Each folder contains at least:
application.properties the configuration item specific for the workflow app itself.${workflow}.sw.yaml the serverless workflow definitions.specs/ optional folder with OpenAPI specs if the flow needs them.All .svg can be ignored, there’s no real functional use for them in deployment and all of them are created by VSCode extension. TODO remove all svg and gitignore them.
Every workflow has a matching container image pushed to quay.io by a github workflows
in the form of quay.io/orchestrator/serverless-workflow-${workflow}.
After image publishing, github action will generate kubernetes manifests and push a PR to the workflows helm chart repo under a directory matching the workflow name. This repo is used to deploy the workflows to an environment with Sonataflow operator running.
/onboardingapplication.properties, onboarding.sw.yaml into that folder.github/workflows/${workflow}.yaml that will call main workflow (see greeting.yaml)charts/workflows/charts/onboarding. You can copy the greeting sub-chart directory and files.See Continuous Integration with make for implementation details of the CI pipeline.
There are two builder images under ./pipeline folder:
Note on CI: On each merge under a workflow directory a matching github workflow executes an image build, generating manifests and a PR create on the helm chart repo. The credentials of this repo are an org level secret, and the content is from a token on the helm repo with an expiry period of 60 days. Currently only the repo owner (rgolangh) can recreate the token. This should be revised.
This workflow is an assessment workflow type, that invokes an application analysis workflow using MTA and returns the move2kube workflow reference, to run next if the analysis is considered to be successful.
Users are encouraged to use this workflow as self-service alternative for interacting with the MTA UI. Instead of running a mass-migration of project from a managed place, the project stakeholders can use this (or automation) to regularly check the cloud-readiness compatibility of their code.
repositoryUrl [mandatory] - the git repo url to examinerecipients [mandatory] - A list of recipients for the notification in the format of user:<namespace>/<username> or group:<namespace>/<groupname>, i.e. user:default/jsmith.MTA version 6.2.x or Konveyor 0.2.x
kubectl create -f https://operatorhub.io/install/konveyor-0.2/konveyor-operator.yaml
| key | default | description |
|---|---|---|
| mta.url | http://mta-ui.openshift-mta.svc.cluster.local:8080 | Endpoint (with protocol and port) for MTA |
| quarkus.rest-client.mta_json.url | ${mta.url}/hub | MTA hub api |
| quarkus.rest-client.notifications.url | ${BACKSTAGE_NOTIFICATIONS_URL:http://backstage-backstage.rhdh-operator/api/notifications/} | Backstage notification url |
| quarkus.rest-client.mta_json.auth.basicAuth.username | username | Username for the MTA api |
| quarkus.rest-client.mta_json.auth.basicAuth.password | password | Password for the MTA api |
All the configuration items are on [./application.properties]

An escalation workflow integrated with Atlassian JIRA using SonataFlow.
admin Role
Note:
The value of the .jiraIssue.fields.status.statusCategory.key field is the one to be used to identify when the done status is reached, all the other
similar fields are subject to translation to the configured language and cannot be used for a consistent check.
Application properties can be initialized from environment variables before running the application:
| Environment variable | Description | Mandatory | Default value |
|---|---|---|---|
JIRA_URL | The Jira server URL | ✅ | |
JIRA_USERNAME | The Jira server username | ✅ | |
JIRA_API_TOKEN | The Jira API Token | ✅ | |
JIRA_PROJECT | The key of the Jira project where the escalation issue is created | ❌ | TEST |
JIRA_ISSUE_TYPE | The ID of the Jira issue type to be created | ✅ | |
OCP_API_SERVER_URL | The OpensShift API Server URL | ✅ | |
OCP_API_SERVER_TOKEN | The OpensShift API Server Token | ✅ | |
ESCALATION_TIMEOUT_SECONDS | The number of seconds to wait before triggering the escalation request, after the issue has been created | ❌ | 60 |
POLLING_PERIODICITY(1) | The polling periodicity of the issue state checker, according to ISO 8601 duration format | ❌ | PT6S |
(1) This is still hardcoded as PT5S while waiting for a fix to KOGITO-9811
mvn clean quarkus:dev
Example of POST to trigger the flow (see input schema in ocp-onboarding-schema.json):
curl -XPOST -H "Content-Type: application/json" http://localhost:8080/ticket-escalation -d '{"namespace": "_YOUR_NAMESPACE_"}'
Tips:
This workflow is using https://move2kube.konveyor.io/ to migrate the existing code contained in a git repository to a K8s/OCP platform.
Once the transformation is over, move2kube provides a zip file containing the transformed repo.
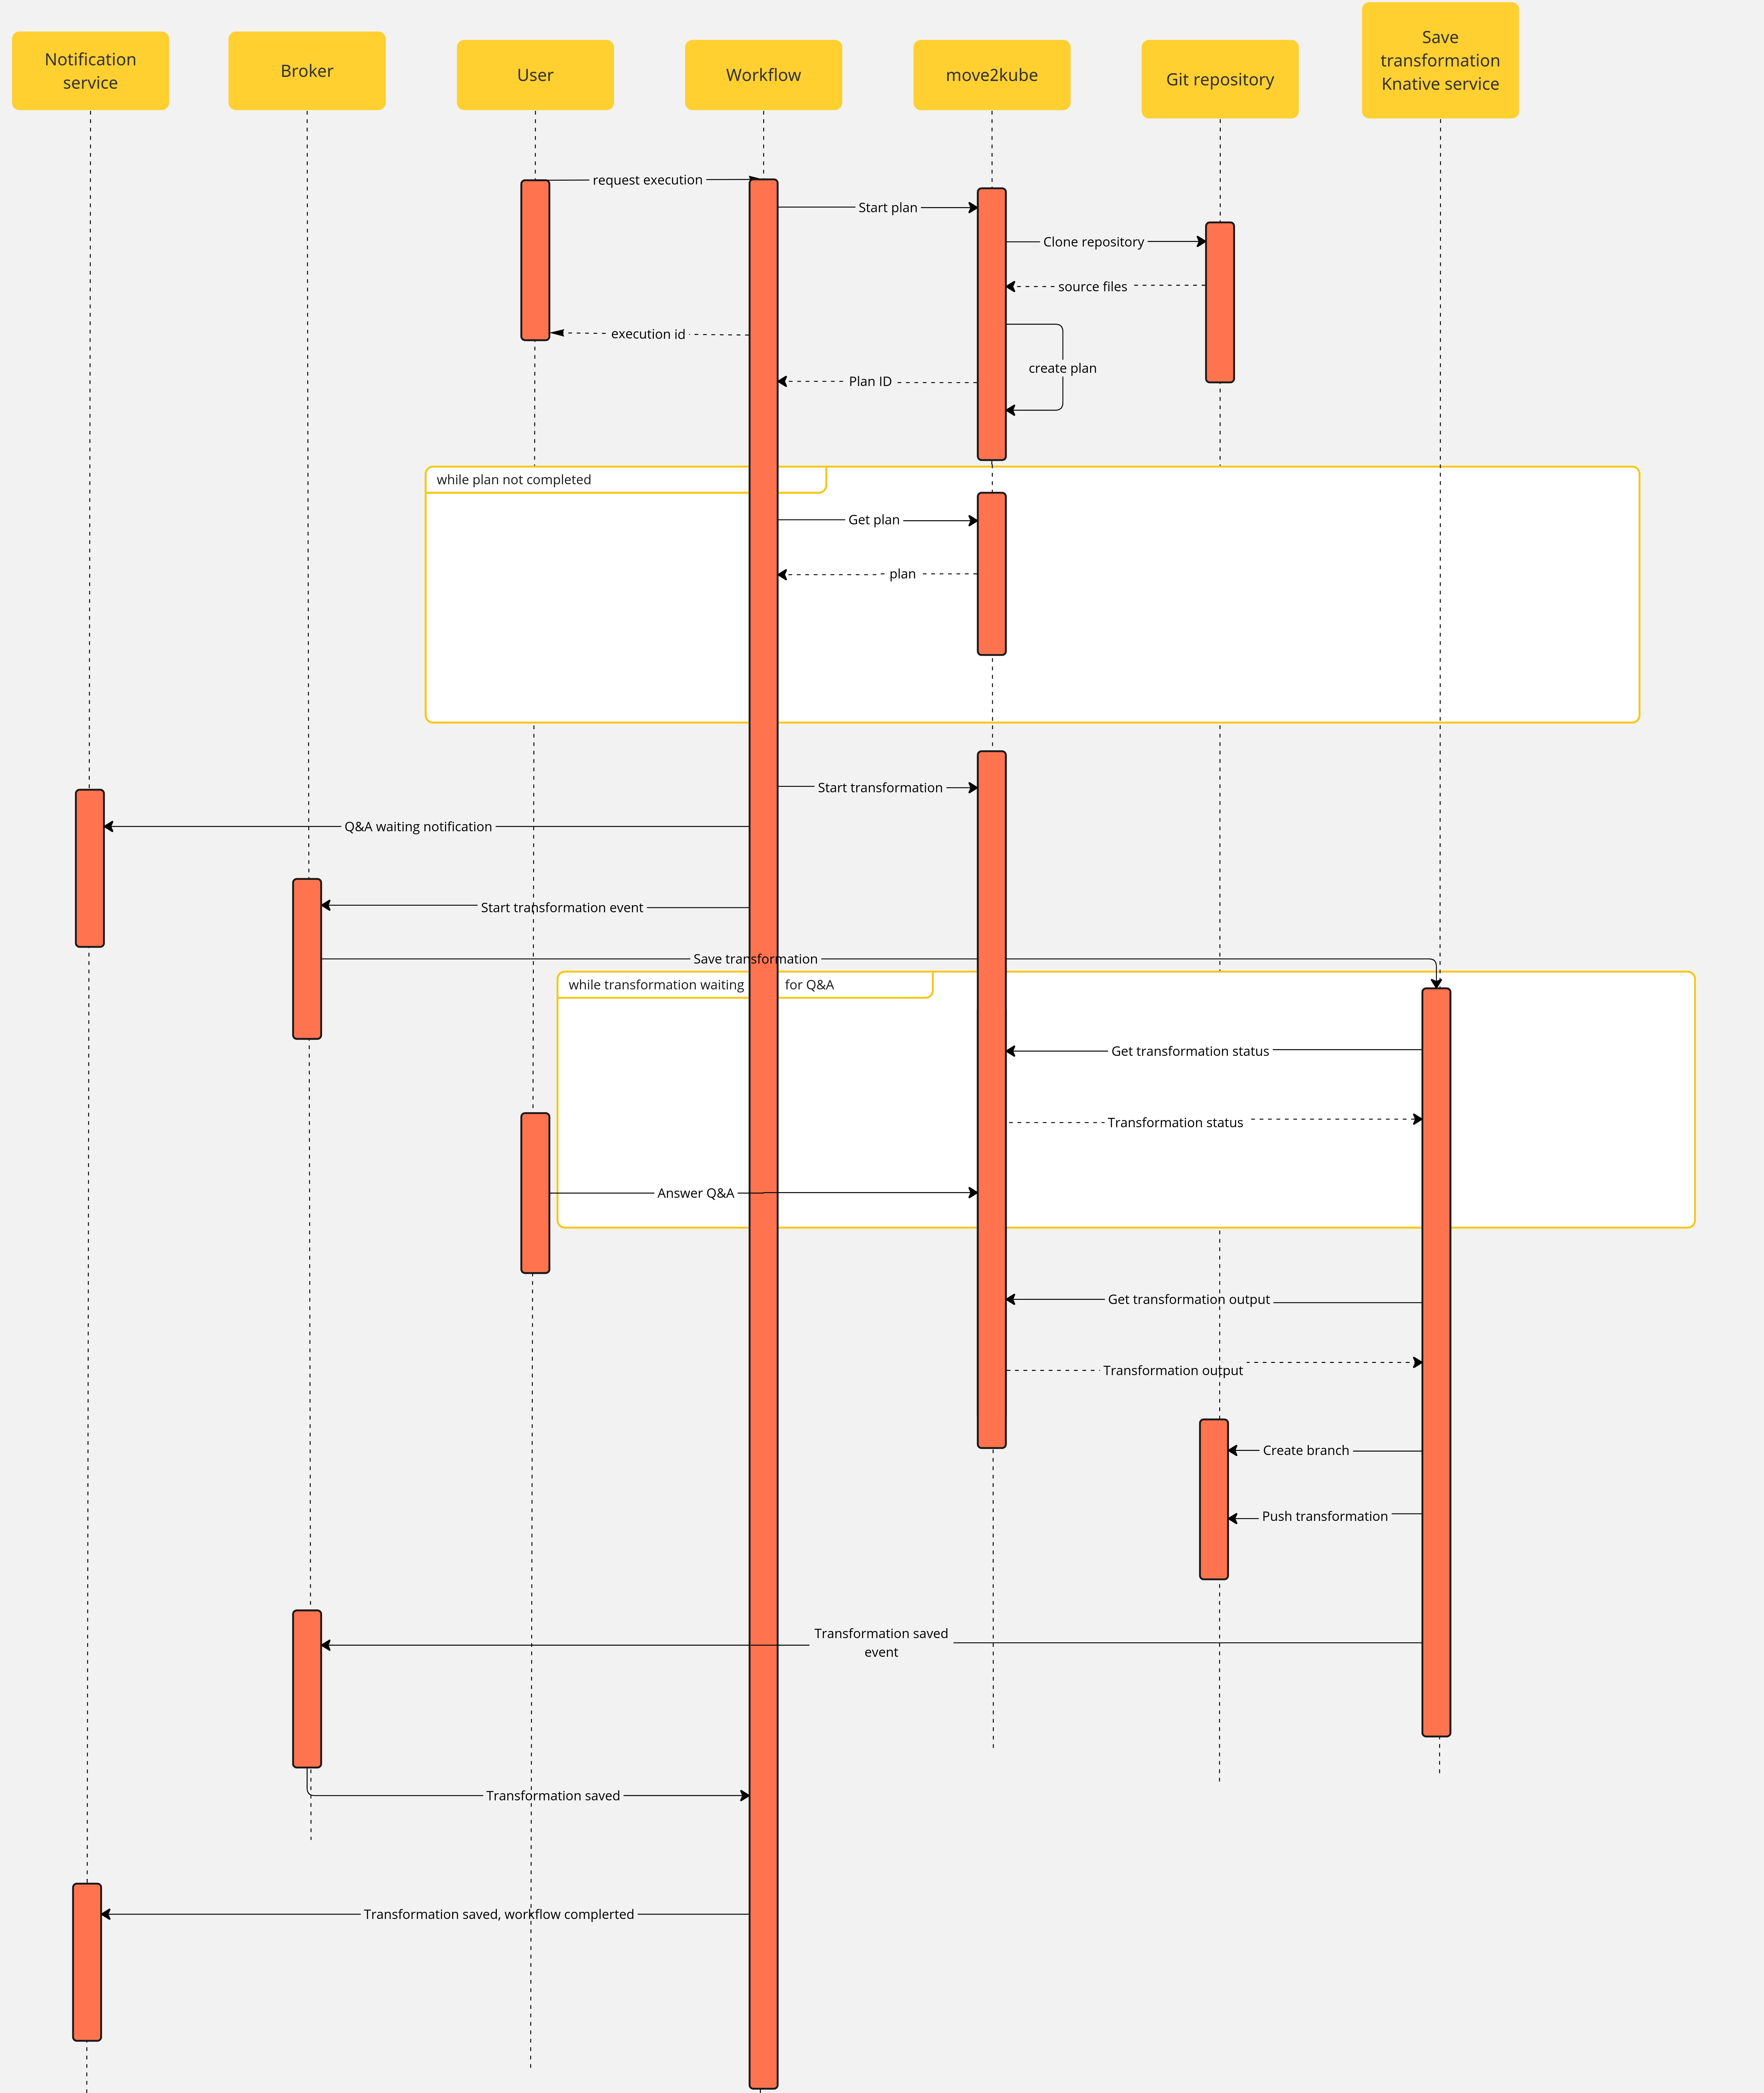


Note that if an error occurs during the migration planning there is no feedback given by the move2kube instance API. To overcome this, we defined a maximum amount of retries (move2kube_get_plan_max_retries) to execute while getting the planning before exiting with an error. By default the value is set to 10 and it can be overridden with the environment variable MOVE2KUBE_GET_PLAN_MAX_RETRIES.
The use case has the following components:
m2k: the Sonataflow resource representing the workflow. A matching Deployment is created by the sonataflow operator..m2k-save-transformation-func: the Knative Service resource that holds the service retrieving the move2kube instance output and saving it to the git repository. A matching Deployment is created by the Knative deployment.move2kube instance: the Deployment running the move2kube instanceTrigger:m2k-save-transformation-event: event sent by the m2k workflow that will trigger the execution of m2k-save-transformation-func.transformation-saved-trigger-m2k: event sent by m2k-save-transformation-func if/once the move2kube output is successfully saved to the git repository.error-trigger-m2k: event sent by m2k-save-transformation-func if an error while saving the move2kube output to the git repository.Broker named default which link the components together.oc -n sonataflow-infra get routes
NAME                                   HOST/PORT                                                                                             PATH   SERVICES                                 PORT    TERMINATION   WILDCARD
move2kube-route                        move2kube-route-sonataflow-infra.apps.cluster-c68jb.dynamic.redhatworkshops.io                               move2kube-svc                            <all>   edge          None
To get it, you can run
oc -n rhdh-operator get routes
Sample output:
NAME                  HOST/PORT                                                                            PATH   SERVICES              PORT           TERMINATION     WILDCARD
backstage-backstage   backstage-backstage-rhdh-operator.apps.cluster-c68jb.dynamic.redhatworkshops.io   /      backstage-backstage   http-backend   edge/Redirect   None
Go to the Orchestrator page.
Click on Move2Kube workflow and then click the run button on the top right of the page.
In the repositoryURL field, put the URL of your git project
In the sourceBranch field, put the name of the branch holding the project you want to transform
mainIn the targetBranch field, put the name of the branch in which you want the move2kube output to be persisted. If the branch exists, the workflow will fail
move2kube-outputIn the workspaceId field, put the ID of the move2kube instance workspace to use for the transformation. Use the ID of the workspace created at the 1st step.
a46b802d-511c-4097-a5cb-76c892b48d71In the projectId field, put the ID of the move2kube instance project under the previous workspace to use for the transformation. Use the ID of the project created at the 1st step.
9c7f8914-0b63-4985-8696-d46c17ba4ebeThen click on nextStep
Click on run to trigger the execution
Once a new transformation has started and is waiting for your input, you will receive a notification with a link to the Q&A
Once you completed the Q&A, the process will continue and the output of the transformation will be saved in your git repository, you will receive a notification to inform you of the completion of the workflow.
Documentation of example workflows from https://github.com/parodos-dev/serverless-workflow-examples
Documents can include markdown content from all the related parodos-dev repositories.
To create a document entry from a markdown file use this:
./generate-doc-for-repo.sh \
    https://github.com/parodos-dev/serverless-workflow-examples/blob/main/README.md > content/docs/workflow-examples/newdoc.md
The assessment common use case is to assess inputs (ie: a link to their project code and/or an application identifying code), and based on a logic determined by the enterprise returns a list of infrastructure workflows.
A workflow of type assessment is then a workflow that performs some checks on user’s input(s) and then recommends suitable workflows of type infrastucture (aka workflow options) for the next step.
The goal in these examples is to show how an assessment workflow can be implemented:
An assessment flow usually consists of:
Note: the workflow options must be an object with six fields: currentVersion, upgradeOptions, migrateOptions, newOptions, continuationOptions, otherOptions. See workflow-option-output-schema.json file definied the data output schema of an assessment workflow in each example.
This assessment workflow uses jq expression to evaluate a user’s input text (inputText) in order to provide recommendation of the suitable infrastructure workflow options.
For simplicity sake, the assessment here consists of checking if inputText contains the keyword dummy and returns the dummy-infra-workflow-option as infrastructure workflow options.
Note: this example assumes that the dummy infrastructure workflow options dummy-infra-workflow-option provided with the core workflow is deployed and up-and-running otherwise it will be filtered out from the precheck subflow upon assessment execution.

The assessment logic is implemented in AssessmentWithCustomCode class and execute function as follows:
if (inputText.toLowerCase().contains("dummy")) { // basic check for infrastructure workflow options recommendation
    workflowOptions.setCurrentVersion(new WorkflowOption("dummy-infra-workflow-option", "Dummy infra workflow option"));
    return workflowOptions;
}
mvn clean quarkus:dev
Example of POST to trigger the flow:
curl -XPOST -H "Content-Type: application/json" http://localhost:8080/assessment-with-custom-code -d '{"inputText": "_YOUR_DUMMY_TEXT_"}'
Response:
{
  "workflowdata": {
    "result": {...},
    "preCheck": {...},
    "inputText": "_YOUR_DUMMY_TEXT_",
    "workflowOptions": {
      "newOptions": [],
      "otherOptions": [],
      "currentVersion": {
        "id": "dummy-infra-workflow-option",
        "name": "Dummy infra workflow option"
      },
      "upgradeOptions": [],
      "migrationOptions": [],
      "continuationOptions": []
    }
  }
}
This assessment workflow uses jq expression to evaluate a user’s input text (inputText) in order to provide recommendation of the suitable infrastructure workflow options.
For simplicity sake, the assessment here consists of checking if inputText contains the keyword dummy and returns the dummy-infra-workflow-option as infrastructure workflow options.
Note: this example assumes that the dummy infrastructure workflow options dummy-infra-workflow-option provided with the core workflow is deployed and up-and-running otherwise it will be filtered out from the precheck subflow upon assessment execution.

The assessment logic is implemented in the workflow definition in assessment-with-jq-expression.sw.yaml file as follows:
- name: AssessState
  type: switch
  dataConditions:
  - condition: "${ .inputText | ascii_downcase | contains(\"dummy\") }" # basic check for infrastructure workflow options recommendation
    transition: JavaWorkflowOptions
  defaultCondition:
    transition: NoWorkflowOptions
mvn clean quarkus:dev
Example of POST to trigger the flow:
curl -XPOST -H "Content-Type: application/json" http://localhost:8080/assessment-with-jq-expression -d '{"inputText": "_YOUR_DUMMY_TEXT_"}'
Response:
{
  "workflowdata": {
    "result": {...},
    "preCheck": {...},
    "inputText": "_YOUR_DUMMY_TEXT_",
    "workflowOptions": {
      "newOptions": [],
      "otherOptions": [],
      "currentVersion": {
        "id": "dummy-infra-workflow-option",
        "name": "Dummy infra workflow option"
      },
      "upgradeOptions": [],
      "migrationOptions": [],
      "continuationOptions": []
    }
  }
}
This assessment workflow uses kn function to evaluate a user’s input text (inputText) in order to provide recommendation of the suitable infrastructure workflow options.
For simplicity sake, the assessment here consists of checking if inputText contains the keyword dummy and returns the dummy-infra-workflow-option as infrastructure workflow options.
Note: this example assumes that the dummy infrastructure workflow options dummy-infra-workflow-option provided with the core workflow is deployed and up-and-running otherwise it will be filtered out from the precheck subflow upon assessment execution.

The assessment logic is implemented in the workflow definition in assessment-with-jq-expression.sw.yaml file as follows:
if (null != input &&
    null != input.getInputText() &&
    input.getInputText().toLowerCase().contains("dummy")) { // basic check for infrastructure workflow options recommendation
    workflowOptions.setCurrentVersion(new WorkflowOption("dummy-infra-workflow-option", "Dummy infra workflow option"));
    return workflowOptions;
}
mvn clean quarkus:dev
Example of POST to trigger the flow:
curl -XPOST -H "Content-Type: application/json" http://localhost:8080/assessment-with-kn-function -d '{"inputText": "_YOUR_DUMMY_TEXT_"}'
Response:
{
  "workflowdata": {
    "result": {...},
    "preCheck": {...},
    "inputText": "_YOUR_DUMMY_TEXT_",
    "workflowOptions": {
      "newOptions": [],
      "otherOptions": [],
      "currentVersion": {
        "id": "dummy-infra-workflow-option",
        "name": "Dummy infra workflow option"
      },
      "upgradeOptions": [],
      "migrationOptions": [],
      "continuationOptions": []
    }
  }
}
This workflow launches an Ansible Automation Platform (AAP) job and send out a notification for success or failure upon completion. The following two (2) inputs are required:

Application properties can be initialized from environment variables before running the application:
| Environment variable | Description | Mandatory |
|---|---|---|
AAP_URL | The AAP server URL | ✅ |
AAP_USERNAME | The AAP server password | ✅ |
AAP_PASSWORD | The AAP server password | ✅ |
mvn clean quarkus:dev
Example of POST to trigger the workflow:
curl -XPOST -H "Content-Type: application/json" http://localhost:8080/aap-job -d '{"jobTemplateId": _JOB_TEMPLATE_ID_, "inventoryGroup": "_INVENTORY_GROUP_", "limit": "_LIMIT_"}'
Response:
{
    "id": "832685aa-0df0-4cf9-9e91-820b013efda6",
    "workflowdata": {
        "jobTemplateId": _JOB_TEMPLATE_ID_,
        "inventoryGroup": "_INVENTORY_GROUP_",
        "limit": "_LIMIT_",
        "launchedJob": {
            "id": 29,
            "failed": false,
            "status": "pending",
            "outputUrl": "https://your-app-platform.io/#/jobs/playbook/29/output"
        }
    }
}
An escalation workflow integrated with ServiceNow using SonataFlow.

manager user in notifications-backend/users.yaml and your file could look something like thisapiVersion: backstage.io/v1alpha1
kind: User
metadata:
name: guest
spec:
profile:
displayName: Guest User
memberOf: []
---
apiVersion: backstage.io/v1alpha1
kind: User
metadata:
name: manager
spec:
profile:
displayName: Manager Approver User
memberOf: []
yarn start:backstage
curl -X POST http://localhost:7007/api/notifications/notifications -H "Content-Type: application/json" -d '{"title": "My message title", "message": "I have nothing to say", "origin": "my-origin", "targetUsers": ["default/manager"]}' | jq '.'
{
    "messageId": "942b0aa0-79d4-46a7-a973-47573fa19543"
}
Application properties can be initialized from environment variables before running the application:
| Environment variable | Description | Mandatory |
|---|---|---|
SN_SERVER | The ServiceNow server URL | ✅ |
SERVICENOW_USERNAME | The ServiceNow server username | ✅ |
SERVICENOW_PASSWORD | The ServiceNow server password | ✅ |
mvn clean quarkus:dev
# This is a request sent to the workflow instance
CREATE_CR_RESP=$(curl -XPOST -H "Content-Type: application/json" http://localhost:8080/servicenow-escalation -d '{
    "description": "<ServiceNow change request description>",
    "short_description": "<ServiceNow change request short_description>",
    "comments": "<ServiceNow change request comments>",
    "state": "new",
    "assigned_to": "<ServiceNow Approver user sys_id> e.g. 950597b6973002102425b39fe153af41",
    "additional_assignee_list": "<ServiceNow Approver user sys_id> e.g. 950597b6973002102425b39fe153af41",
    "assignment_group": "<ServiceNow Approver group sys_id> e.g. e50597b6973002102425b39fe153afb2",
    "sn_url": "https://<ServiceNow URL>"
}');
echo $CREATE_CR_RESP |  jq '.';
{
  "id": "99203918-3e8c-46a6-ba43-9a025172f8c2",
  "workflowdata": {
    "description": "Requester requesting an item",
    "short_description": "Requester requesting an item in short",
    "comments": "Requester requesting an item in comments",
    "state": "new",
    "assigned_to": "950597b6973002102425b39fe153af41",
    "additional_assignee_list": "950597b6973002102425b39fe153af41",
    "assignment_group": "e50597b6973002102425b39fe153afb2",
    "createdChangeRequest": {
      "result": {
        "sys_id": "6dfa4ff7973002102425b39fe153afed",
        "state": "-5",
        "number": "CHG0030045"
      }
    }
  }
}
CREATED_CR_SYS_ID=$( jq -r  '.workflowdata.createdChangeRequest.result.sys_id' <<< "${CREATE_CR_RESP}" );
echo "${CREATED_CR_SYS_ID}";
assessment state.TRIGGER_CR_CMD="curl --location --request PUT 'https://dev143716.service-now.com/api/now/table/change_request/${CREATED_CR_SYS_ID}' \
--header 'Content-Type: application/json' \
--header 'Authorization: Basic <your auth header value>' \
--data '{
\"state\": \"-4\",
\"approval\": \"requested\"
}'";
eval $TRIGGER_CR_CMD | jq '.';
Wait for a minute or two before proceeding to the next step, to view notifications created by the workflow, to remind the approver to approve the created change request.
30s by the workflow.After this wait, login to notifications service’s postgres database console.
You will see reminder notification(s) created by Notifications service as shown in the following example.
                  id                  |                               message
--------------------------------------+---------------------------------------------------------------------
 8a3c945d-9009-4188-a28e-17ceee853a99 | Manager, please approve the change request: CHG0030045
manager user and credentials.State to Approved and click Update.thank you notification created by Notifications service as shown in the following example.
Note: this may appear after a few seconds, as the workflow needs to wait for completion of the timeout event of 30s, before this notification is created. id | message
--------------------------------------+---------------------------------------------------------------------
3e9cd0a6-c4c8-4ea1-973a-dbb063279397 | Manager, thanks a ton for approving the change request: CHG0030045
Tips:
This workflow demonstrates creating Tekton resources in a Kubernetes cluster.
We create the following Kubernetes resources (in order as they appear):
a namespace called tekton-example
2 Tasks, task-1 and task-2, that echo the message:
Hi I am task #X
a Pipeline that executes the tasks one after the other
a PipelineRun for executing the Pipeline

Application properties can be initialized from environment variables before running the application:
| Environment variable | Description | Mandatory | Default value |
|---|---|---|---|
OCP_API_SERVER_URL | The OpensShift API Server URL | ✅ | |
OCP_API_SERVER_TOKEN | The OpensShift API Server Token | ✅ |
mvn clean quarkus:dev
Example of POST to trigger the flow:
curl -X POST -H "Content-Type: application/json" http://localhost:8080/tekton
The response will include the created resources (IDs, statuses and such)
The Orchestrator for Backstage is a mechanism designed to facilitate the implementation and execution of developer self-service flows. It serves as a vital component that enhances and augments the existing scaffolder functionality of Backstage with a more flexible and powerful set of features including long-running and asynchronous flows.
The orchestrator works harmoniously with other Backstage components such as the Software Catalog, permissions, and plugins as well as others. By leveraging its capabilities, organizations can orchestrate and coordinate developer self-service flows effectively.
The Backstage Orchestrator plugin aims to provide a better option to Scaffolder, based on workflows to have a more flexible and powerful tool that addresses the need by streamlining and automating processes, allowing developers to focus more on coding and innovation.
The orchestrator relies on SonataFlow, a powerful tool for building cloud-native workflow applications.
The main idea is to keep the same user experience for users, leveraging the UI components, input forms, and flow that Scaffolder provides, this way it should be straightforward for users and transparent no matter whether using Templates or Workflows, both can live together being compatible with integration points.
The orchestrator controls the flow orchestrating operations/tasks that may be executed in any external service including Scaffolder Actions, this way it is possible to leverage any existing Action hence Software Templates can be easily migrated to workflows opening the door to extend them to more complex use cases.
Advanced core capabilities
Client-side tooling
The Orchestrator plugin is composed of the following packages:
@janus-idp/backstage-plugin-orchestrator-backend package connects the Backstage server to the Orchestrator. For setup process, see Backend Setup@janus-idp/backstage-plugin-orchestrator package contains frontend components for the Orchestrator plugin. For setup process, see Frontend Setup@janus-idp/backstage-plugin-orchestrator-common package contains shared code between the Orchestrator plugin packages.Please follow this link for instructions: https://github.com/janus-idp/backstage-showcase/blob/main/showcase-docs/dynamic-plugins.md#helm-deployment
The following configuration is required for the Orchestrator plugin to work properly:
backend:
  csp:
    frame-ancestors: ['http://localhost:3000', 'http://localhost:7007']
    script-src: ["'self'", "'unsafe-inline'", "'unsafe-eval'"]
    script-src-elem: ["'self'", "'unsafe-inline'", "'unsafe-eval'"]
    connect-src: ["'self'", 'http:', 'https:', 'data:']
orchestrator:
  sonataFlowService:
    baseUrl: http://localhost
    port: 8899
    autoStart: true
    workflowsSource:
      gitRepositoryUrl: https://github.com/parodos-dev/backstage-orchestrator-workflows
      localPath: /tmp/orchestrator/repository
  dataIndexService:
    url: http://localhost:8899
sonataFlowService config section must be entirely omitted and the dataIndexService.url must point to the existing Data Index Service.For more information about the configuration options, including other optional properties, see the config.d.ts file.
Install the Orchestrator backend plugin using the following command:
yarn workspace backend add @janus-idp/backstage-plugin-orchestrator-backend
Create a new plugin instance in packages/backend/src/plugins/orchestrator.ts file:
import { Router } from 'express';

import { createRouter } from '@janus-idp/backstage-plugin-orchestrator-backend';

import { PluginEnvironment } from '../types';

export default async function createPlugin(
  env: PluginEnvironment,
): Promise<Router> {
  return await createRouter({
    config: env.config,
    logger: env.logger,
    discovery: env.discovery,
    catalogApi: env.catalogApi,
    urlReader: env.reader,
    scheduler: env.scheduler,
  });
}
Import and plug the new instance into packages/backend/src/index.ts file:
/* highlight-add-next-line */
import orchestrator from './plugins/orchestrator';

async function main() {
  // ...
  const createEnv = makeCreateEnv(config);
  // ...
  /* highlight-add-next-line */
  const orchestratorEnv = useHotMemoize(module, () =>
    createEnv('orchestrator'),
  );
  // ...
  const apiRouter = Router();
  // ...
  /* highlight-add-next-line */
  apiRouter.use('/orchestrator', await orchestrator(orchestratorEnv));
  // ...
}
Install the Orchestrator backend plugin using the following command:
yarn workspace backend add @janus-idp/backstage-plugin-orchestrator-backend
Add the following code to the packages/backend/src/index.ts file:
const backend = createBackend();

/* highlight-add-next-line */
backend.add(
  import('@janus-idp/backstage-plugin-orchestrator-backend/alpha'),
);

backend.start();
Install the Orchestrator frontend plugin using the following command:
yarn workspace app add @janus-idp/backstage-plugin-orchestrator
Add a route to the OrchestratorPage and the customized template card component to Backstage App (packages/app/src/App.tsx):
/* highlight-add-next-line */
import { OrchestratorPage } from '@janus-idp/backstage-plugin-orchestrator';

const routes = (
  <FlatRoutes>
    {/* ... */}
    {/* highlight-add-next-line */}
    <Route path="/orchestrator" element={<OrchestratorPage />} />
  </FlatRoutes>
);
Add the Orchestrator to Backstage sidebar (packages/app/src/components/Root/Root.tsx):
/* highlight-add-next-line */
import { OrchestratorIcon } from '@janus-idp/backstage-plugin-orchestrator';

export const Root = ({ children }: PropsWithChildren<{}>) => (
  <SidebarPage>
    <Sidebar>
      <SidebarGroup label="Menu" icon={<MenuIcon />}>
        {/* ... */}
        {/* highlight-add-start */}
        <SidebarItem
          icon={OrchestratorIcon}
          to="orchestrator"
          text="Orchestrator"
        />
        {/* highlight-add-end */}
      </SidebarGroup>
      {/* ... */}
    </Sidebar>
    {children}
  </SidebarPage>
);
The Orchestrator plugin enhances the Backstage with the execution of developer self-service flows. It provides a graphical editor to visualize workflow definitions, and a dashboard to monitor the execution of the workflows.
Refer to the Quick start to install the Orchestrator using the helm chart and execute a sample workflow through the Red Hat Developer Hub orchestrator plugin UI.
The plugin provides OpenAPI v2 endpoints definition to facilitate communication between the frontend and backend. This approach minimizes the data that needs to be sent to the frontend, provides flexibility and avoids dependencies on changes in the CNCF serverless specification. It also allows for a seamless transition if there’s a need to replace the backend implementation.
In addition, by leveraging on OpenAPI spec, it is possible to generate clients and create CI steps.
OpenAPI specification file is available in orchestrator-common.
NOTE:
While the OpenAPI specification is available in the Orchestrator plugin, the UI currently does not rely on this spec.
We plan to incorporate v2 endpoints into the UI in the near future.
The typescript schema is generated in auto-generated folder from openapi.yaml specification file.
The orchestrator backend can use the generated schema to validate the HTTP requests and responses.
NOTE: Temporary the validation has been disabled. It will be enabled when the orchestrator frontend will switch to the use of v2 endpoints only.
Checkout the backstage-plugin
git clone git@github.com:janus-idp/backstage-plugins.git
If you need to change the OpenAPI spec, edit the openapi.yaml according to your needs and then execute from the project root folder:
yarn --cwd plugins/orchestrator-common openapi
This command updates the auto-generated files and the auto-generated docs.
NOTE: Do not manually edit auto-generated files
If you add a new component in the spec, then you need to export the generated typescript object here. For example, if you define
components:
  schemas:
    Person:
      type: object
      properties:
        name:
          type: string
        surname:
          type: string
then
export type Person = components['schemas']['Person'];
When defining a new endpoint, you have to define the operationId.
That id is the one that you can use to implement the endpoint logic.
For example, let’s assume you add
paths:
  /names:
    get:
      operationId: getNames
      description: Get a list of names
      responses:
        '200':
          description: Success
          content:
            application/json:
              schema:
               type: array
                items:
                  $ref: '#/components/schemas/Person'
Then you can implement the endpoint in router.ts referring the operationId getNames:
api.register('getNames', async (_c, _req, res: express.Response, next) => {
  // YOUR LOGIC HERE
  const result: Person[] = [
    { name: 'John', surname: 'Snow' },
    { name: 'John', surname: 'Black' },
  ];

  res.status(200).json(result);
});
Documentation section of notifications plugin. This plugin is part of Backstage Core.
Upstream documentation can be found in:
The frontend UI is implemented as a side bar item.
The following screenshots show how to use the notifications UI.
Whenever a new notification is detected the frontend pops an alert to the user.


The backend plugin provides the backend application for reading and writing notifications.
Two kinds of authentation are in place with Notifications Plugin:
For reading notifications the JWT token generated by backstage IDP with typ vnd.backstage.user is used. The JWT claim sub will be the one used to filter the notifications.
For creating the notifications, the Backstage Static Tokens will be used, the following configuration is needed on app-config.yaml
backend:
  auth:
    externalAccess:
      - type: static
        options:
          token: lBb9+r50NUNYxKicBZob0NjespLBAb9C
          subject: notifications-access
The definition of the POST request is defined upstream and example can be found in upstream repo. And here is an example on how to push a notification using a simple curl request:
curl https://$HOST/api/notifications \
       -H "Content-Type: application/json" \
       -H "Authorization: Bearer lBb9+r50NUNYxKicBZob0NjespLBAb9C" \
       -d '{ "recipients": { "type": "entity", "entityRef": [ "user:default/alice" ] }, "payload": { "title": "important message", "link": "http://redhat.com/", "severity": "high", "topic": "Notification" }}'
The plugin support the standard way to deny or allow request for an specific token. The configuration is explained in the Backstage docs
The plugin provide an OpenAPI spec which is explained here
It is possible to forward notification content to email address. In order to do that you must add the Email Processor Module to your backstage backend. The email title is taken from the notification title and the email body is taken from the notification’s description and link.
An example configuration, as well as a link to all configuration options, can be found in the module’s readme.
The configuration of the module explains how to configure filters. Filters are used to ignore notifications that should not be forwarded to email. The supported filters include minimum/maximum severity and list of excluded topics.
Each user notification has a list of recipients. The recipient is an entity in backstage catalog. The notification will be sent to the email addresses of the recipients.
In broadcast notifications we do not have recipients. The module’s configuration supports a few options for broadcast notifications: